Kata-kata Bijak

Hey there, music lovers! Are you tired of not being able to share your favorite Apple Music playlists with your family members? Well, fear not, because we've got you covered!

Adding Family Members to Apple Music

Family Members on Apple Music

First things first, let's talk about how to add family members to Apple Music. It's actually pretty simple! All you have to do is follow these steps:

  1. Open the Apple Music app on your device and go to your profile.
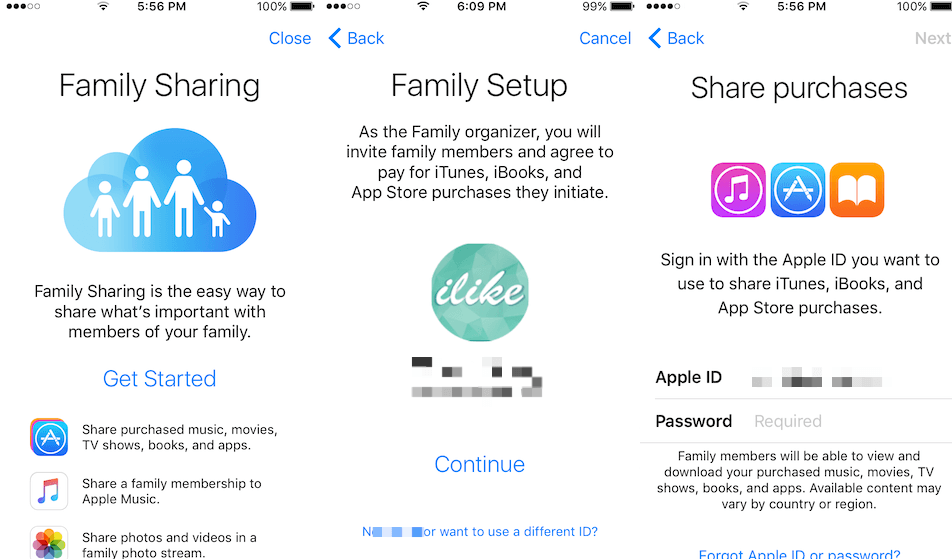
  2. Tap on the "Family Sharing" option.
  3. Tap on the "Set Up Family Sharing" button.
  4. Follow the prompts to invite family members to join your plan.

And voila, you're done! Your family members can now access all of the great tunes on Apple Music.

Adding Family Members to Apple Music (Alternative Method)

Apple Family Sharing

But wait, there's another way to add family members to Apple Music! If the first method didn't work for you, try this:

  1. Open the "Settings" app on your device.
  2. Tap on your name (or the name of the person who set up the account).
  3. Select "Family Sharing".
  4. Select "Add Family Member".
  5. Choose how you want to invite your family member (via iMessage, email, etc.).
  6. Follow the prompts to send the invitation.
  7. Once your family member accepts the invitation, they'll be added to your plan!

Easy peasy, right?

Why Share Apple Music?

Sharing music with family members

Now that you know how to add family members to Apple Music, you may be wondering why you should even bother. Well, there are a ton of great reasons to share your tunes with your loved ones!

  • It's a great way to bond with your family members over shared interests.
  • You can share your favorite playlists and discover new music together.
  • With family sharing, everyone can enjoy their own personalized experience within the same account.
  • It's cost-effective. Instead of paying for multiple individual accounts, you can just pay for one family plan.

So what are you waiting for? Share your tunes and spread the love!

Troubleshooting Common Issues

Error message on Apple Music

Of course, with any technology, there may be some hiccups along the way. Here are some common issues you may encounter when adding family members to Apple Music:

  • If you're unable to add family members, make sure you're signed in with the correct Apple ID and that you have Family Sharing set up.
  • If you're still having trouble, try restarting your device or updating to the latest version of Apple Music.
  • If you receive an error message, double-check that you've entered the correct information (such as email addresses) for your family members.

And there you have it, folks! Adding family members to Apple Music is a great way to share your favorite tunes and bond with your loved ones. With just a few simple steps, you'll be on your way to jamming out together in no time.


How do i add family members to apple music?. How to set up family sharing on your iphone, ipad, or mac. How to fix apple music family sharing not working in 2021. How to add a family member to apple music. How to add a family member to apple music. How add a family member to your apple music subscription appleinsider. Partage ios configurar mac invalid occurring xs ios13


If you are searching about How to add a family member to apple music, you've visit to the right page. We have images like How to add a family member to apple music, how to add a family member to apple music, how to add a family member to apple music. Here it is:


How add a family member to your apple music subscription appleinsider, how to fix apple music family sharing not working in 2021


As a society, we have become increasingly aware of the importance of maintaining cleanliness, especially in public places. This has led to a greater emphasis on sanitation practices and the use of different types of sanitizers. However, with the multitude of options available in the market, it can be difficult to determine which sanitizer is the most effective. This is where sanitizer test kits come in.

Acid Sanitizer EndPoint ID® Test Kits

Acid Sanitizer EndPoint ID Test Kits

Acid Sanitizer EndPoint ID® Test Kits are a great option for testing the effectiveness of acid sanitizers. These test kits use a highly sensitive indicator that changes color depending on the pH of the sanitizer solution. This allows for accurate and reliable testing of the sanitizer's effectiveness.

QC1001 Quaternary Sanitizer Test Strips

QC1001 Quaternary Sanitizer Test Strips

QC1001 Quaternary Sanitizer Test Strips are another popular choice for testing the effectiveness of sanitizers. These test strips are specifically designed to detect the concentration of quaternary compounds, which are commonly used in sanitizers. By using these test strips, you can ensure that your quaternary sanitizer is working at optimal levels.

15' Chlorine Sanitizer Test Kit

15' Chlorine Sanitizer Test Kit

For those using chlorine as their sanitizer of choice, the 15' Chlorine Sanitizer Test Kit is a great option. This test kit accurately measures the concentration of chlorine in the solution, ensuring that it is at the correct level for maximum effectiveness.

Acid Sanitizer Test Kit AquaPhoenix Scientific

Acid Sanitizer Test Kit AquaPhoenix Scientific

Another option for testing acid sanitizers is the Acid Sanitizer Test Kit from AquaPhoenix Scientific. This test kit includes all the necessary materials to quickly and easily test the pH of your sanitizer solution. By using this test kit, you can ensure that your acid sanitizer is working to its full potential.

In conclusion, sanitizer test kits are a necessary tool for anyone who wants to maintain a clean and sanitary environment. By using these kits, you can be confident that your sanitizers are working effectively and keeping your surroundings safe and germ-free. Consider investing in one of these test kits today to ensure that your sanitizers are performing at their best!


Aquaphoenix iodine sanitizer test kit, 1 drop = 2 ppm / 10ml tk6000z. Sanitizer test strips fmp chlorine strip vial kit. Sanitizer quaternary hydrion 1000ppm quat agromarket. Test iodine sanitizer kits 10ml ppm drop kit. Iodine sanitizer test kit aquaphoenix scientific. Quaternary sanitizer test stripsonaroll sold per roll. Sanitizer quaternary


If you are searching about Steramine quaternary sanitizer test kit 32 test strips amazon.co.uk, you've visit to the right place. We have pictures like Test sanitizer aztec promotional group, acid sanitizer endpoint id® test kits, test strips and sanitizers a complete buying guide back burner. Here you go:


15' chlorine sanitizer test kit, aquaphoenix acid sanitizer test kit tk8000z


You may have recently purchased a Chromebook and noticed that there is no Caps Lock key. This can be confusing and frustrating, especially if you are accustomed to using this key on a regular basis. But don't worry, there are multiple ways to enable and use Caps Lock on your Chromebook.

Method 1: Use the Launcher Key

One way to enable Caps Lock on your Chromebook is to use the Launcher Key. This key is located in the bottom-left corner of your keyboard and is represented by a magnifying glass.

To use Caps Lock, simply press the Launcher Key and the Search Key (which has a magnifying glass and is located in the bottom-left corner of your keyboard). This will enable Caps Lock and allow you to type in all capital letters.

Chromebook Caps Lock Method 1

If you need to turn off Caps Lock, simply press the Launcher Key and the Search Key again. This will disable Caps Lock and allow you to type normally.

Method 2: Use the Alt Key

Another way to enable Caps Lock on your Chromebook is to use the Alt Key. This key is located in the bottom-left corner of your keyboard and is represented by the word "Alt".

To use Caps Lock, press and hold down the Alt Key and then press the Search Key. This will enable Caps Lock and allow you to type in all capital letters.

Chromebook Caps Lock Method 2

If you need to turn off Caps Lock, simply press any key on your keyboard. This will disable Caps Lock and allow you to type normally.

Method 3: Use the Settings Menu

A third way to enable Caps Lock on your Chromebook is to use the Settings Menu. This method is a bit more involved, but it is still fairly easy to do.

First, click on the status area (which is located in the bottom-right corner of your taskbar).

Chromebook Caps Lock Method 3

Next, click on the Settings icon (which looks like a gear).

Scroll down until you see the "Device" section and then click on "Keyboard."

Under "Keyboard," turn on the option for "Enable Caps Lock."

Once you have enabled Caps Lock, simply press the Search Key twice to turn it on. To turn off Caps Lock, press the Search Key twice again.

Conclusion

Using a Chromebook can be a little different than using a traditional Windows or Mac laptop, but it doesn't have to be difficult. Enabling Caps Lock on your Chromebook is fairly easy, and there are multiple methods to choose from.

Chromebook Caps Lock Conclusion

Whether you choose to use the Launcher Key, the Alt Key, or the Settings Menu, you can easily enable Caps Lock and type in all capital letters when you need to.

So go ahead and give it a try! Who knows, you may even find that using Caps Lock on your Chromebook is easier and more convenient than you thought.


Lock shortcut chromebook screenshot keyboard screen take partial touch windows chrome using use. How to turn on caps lock on a chromebook laptop mag. How to enable caps lock on a chromebook — multiple methods. Chromebook scroll. How to caps lock on your chromebook youtube. Caps lock chromebook turn. Chromebook tecla howtogeek obter fedewa


If you are looking for How to get a caps lock key on your chromebook, you've came to the right page. We have images like How to turn caps lock on and off on your chromebook, since there's no, how to turn off caps lock on chromebook chrome story, how to turn on caps lock on a chromebook laptop mag. Here it is:


How to get a caps lock key on your chromebook, how to remap the keys on your chromebook android central


Search This Blog

Menu Halaman Statis